 QuickBooks · Feb 23rd 2026 · 7 Min read
QuickBooks Hosting Mode is Off: How to Turn On and Off
If you’re using QuickBooks and want multiple users to access your company file at the same time, you might encounter an issue where “QuickBooks Hosting Mode is Off.” This means other users can’t connect to the file over the network. In this guide, we’ll explain what Hosting Mode means, why it turns off, and provide simple step-by-step instructions to enable or disable it properly, even if you’re not a technical expert.
Requirements For QuickBooks Hosting Mode On
| Component | Requirement |
| System Requirements | |
| Operating System (OS) | Windows 8 or later (Windows 8, Windows 8.1, and Windows 10) |
| Internet Connection | Stable broadband connection (avoid satellite) |
| Network | Reliable network connection with outbound port 3389 open |
| Software Requirements | |
| QuickBooks Version | Version supporting multi-user mode |
| QuickBooks Database Server Manager | Running on the host computer |
| File Permissions | Shared folder with appropriate read/write permissions |
| Hardware Requirements (Minimum) | |
| Processor | Intel Core i3 or equivalent |
| RAM | 8 GB |
| Storage | 2.5 GB free disk space + additional space for company data |
| Screen Resolution | 1280×1024 or higher (recommended) |
| Hardware Requirements (Recommended) | |
| Processor | Intel Core i5 or i7 |
| RAM | 16 GB |
| Storage | SSD for optimal performance |
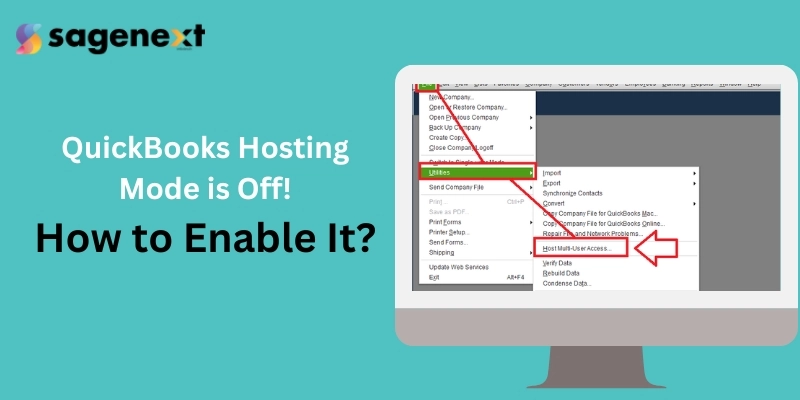
How to Turn On or Enable Hosting Mode in QuickBooks?
- Open QuickBooks Desktop on the host computer.
- Click on the File menu.
- Hover over Utilities and select Host Multi-User Access.
- Click Yes to enable Hosting Mode.
Additional Considerations
- Network Sharing: Ensure proper network sharing is enabled on the computer hosting the company file. Refer to your Windows settings for enabling file and printer sharing if needed.
- Firewall Exceptions: Firewall software might restrict communication. Make sure QuickBooks and related services are allowed through the firewall.
Additional Configurations for Enabling QuickBooks Hosting Mode
Windows File Sharing
- Right-click the folder containing your company file.
- Select “Properties” followed by “Sharing”.
- Click “Share” and choose “QBDataServiceUserXX” (XX representing your version).
- Grant “Full Control” permission for this user.
For Windows Server 2012 and above
- Access “Server Manager”.
- Navigate to “File Services” -> “Shares”.
- Click “New Share” and select “SMB Share – Quick”.
- Choose a custom path to your company file location.
- Grant read/write permissions for the appropriate users.
Turning Off QuickBooks Hosting Mode
- Open QuickBooks Desktop on the host computer.
- Click “File” and select “Utilities”.
- If “Stop Hosting Multi-User Access” is displayed, Hosting Mode is already disabled.
- If “Host Multi-User Access” is shown, click it to disable Hosting Mode.
Important Note: Disabling Hosting Mode restricts access to the company file to a single user at a time.
Conclusion
QuickBooks Hosting Mode empowers multiple users to access your company file simultaneously, streamlining collaboration and boosting efficiency. This translates to real-time collaboration and increased efficiency. However, if you encounter a message indicating “QB Hosting Mode is Off,” don’t worry! Simply follow the steps outlined above to enable it and unlock the ability to grant access to other users.
Next, remember to establish user accounts and permissions within QuickBooks. This ensures each user has the appropriate level of access to the company file. In addition, consider setting up different permission levels to match individual user needs. Share the company file folder on your network to allow others to access it remotely.

