 QuickBooks · Jul 30th 2025 · 7 Min read
How to Fix QuickBooks Error 9999? A Complete Step-wise Guide
Alright! We know you are a QuickBooks user and rely on its service to run your business operations. Have you encountered any QuickBooks errors? If so, you are not alone. QuickBooks error 9999 is one of the most common bank-related errors you may encounter. Getting rid of these errors can become a tedious task for many. If you are a CPA or accountant seeking a straightforward solution to QuickBooks error 9999, we have got you covered.
Did you know? QuickBooks is one of the most used software tools across the United States and Canada for accounting and financial management purposes. Millions of users rely on QuickBooks, but as the number of users increases, errors are bound to happen. But how do you tackle them?
In this guide, we will be sharing a complete step-by-step solution to eliminate QuickBooks error 9999.
What is Error Code 9999 in QuickBooks?
QuickBooks error 9999 is a script error that disrupts the connection between QuickBooks Online and your bank. The errors send a message saying bank transactions aren’t updating to your QuickBooks Online account. Error 9999 in QuickBooks prevents you from updating any bank feed or completing transactions on your online banking website. When you attempt to update your bank information, it prevents the update from being applied in QuickBooks.
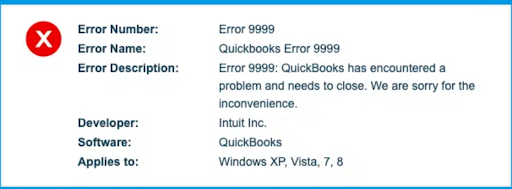
Glimpse of how QuickBooks Error 999 displays the message. It states, ‘Error 9999: QuickBooks has encountered a problem and needs to close.’
Complete Step-by-step Guide to Fix QuickBooks Online Error 9999
Method. 1: Update Your Bank Account Several Times
- Step. 1: Head on to QuickBooks Online and open the application.
- Step. 2: On the left-hand side panel, choose the banking tab.
- Step. 3: Now, click on the Update option.
- Step. 4: Now close the application. Follow the same steps 3-4 times, if it doesn’t remove the 9999 error in one attempt.
If method one doesn’t work for you, try the following method given below.
Method. 2: Clear Your Browser Cache Files
| Google Chrome | Windows Explorer | Apple Safari |
| → On the Google Chrome web browser, in the address bar, type chrome://settings/clearBrowserData and click Enter
→ Check the cache files box → Now, click the clear data button. |
→ Press Control + Shift + Delete
→ Check the temporary files box and click Delete browsing history page. → Click on the Delete button to remove the cache files. |
→ Click on the Develop Tab from the top bar option
→ Then click on the Empty Cache File option to remove cache files. |
If method two still doesn’t resolve your QuickBooks error 9999, then move on to the following method.
Method. 3: Disconnect/Reconnect Your Bank Account
Step to Disconnect Your Account:
- Step. 1: Go to QuickBooks Online and open the application
- Step. 2: In the left-hand side panel, select the Banking option
- Step. 3: Now, click the Edit option on the menu for disconnecting your bank account.
- Step. 4: You need to check ‘Disconnect this Account’. And click Save to continue in the Account window section.
- Step. 5: Click on the Save option and Close.
Step to Reconnect Your Account:
- Step. 1: From the same left-hand side panel, click the Banking option to Add Account.
- Step. 2: Enter Bank Credentials to log in and continue.
- Step. 3: Follow the security prompts and continue.
- Step. 4: Select Securely Connect and click on the added bank account icon.
- Step. 5: Now you need to select the type of account from the drop-down menu.
- Step. 6: Now, you need to select the type of account: either a Credit Card or a Bank Account.
- Step. 7: Click “Add Now” to add a new bank account, or if you have already added a bank account, click “Connect”. By now, your QuickBooks error 9999 must have been removed. If not, follow the next method.
Method. 4: Log in From Your Bank Website
- Step. 1: Visit your bank website.
- Step. 2: Log in to your bank account using your credentials and OTP verification.
- Step. 3: Once you have logged in to your bank account on the bank website, go to QuickBooks Online and update your bank details. By now, your bank details must have been updated. If not, follow the next method suggested.
Method. 5: Re-Install QuickBooks
- Step. 1: Head to your computer’s control panel and uninstall the QuickenBooks Desktop application.
- Step. 2: Once the QuickBooks Desktop Application is removed from your computer, you need to visit the QuickBooks official website to download the QuickBooks application again.
- Step. 3: Now, reinstall the QB desktop and log in with your credentials. Then, update your bank account details; your bank details will now be updated successfully.
From the above suggested five Methods, we hope that one of the other methods will work for your QuickBooks error 9999. If the problem persists, you can always get in touch with us, and we will deploy our experts to get the problem solved in no time.
Concluding Lines
If you are a QuickBooks user, you are bound to face error 9999 in QuickBooks. It will prevent you from updating your bank transactions due to several problems. QuickBooks error 9999 can be solved by following our curated step-by-step guide. We have diligently provided you with five methods to remove error 9999 with simple steps. QuickBooks has many other error codes that frequently appear and are encountered by several users worldwide. If you want to resolve other QuickBooks errors, read our support and blog posts for similar guides.
FAQs (Frequently Asked Questions)
What is error 9999 in banking?
Error 9999 in QuickBooks is a banking error that prevents you from updating your bank transactions in the QB application.
How do I fix other errors in QuickBooks?
You can fix other errors in QuickBooks by following Sagenext curated QuickBooks error guide.

