Set Up Your QuickBooks Web Connector
The QuickBooks Web Connector (QBWC) is an application for Microsoft Windows that lets web-based applications share data with QuickBooks Desktop products (including QuickBooks Financial Software and (QuickBooks Point of Sale). It also aids in efficiently running on-premises and cloud-based accounting servicing like accepting payments, managing bills, and handling payroll.
Table of Contents:
How Do I Set Up QuickBooks Web Connector
Step 1: Download QuickBooks Web Connector

To exchange information with third-party online applications when you are using QuickBooks in multi-user mode, you must download and install the web connector app on every workstation in your network.
Read this also: How to Solve QuickBooks Multi-User Mode Not Working
Follow all the given steps for QWC web connector download
for Desktop:
- Create a new folder with the name of ‘Temp’ in the C drive of your computer.
- Download the QB Web Connector installer file Here
- Open the downloaded files of your computer and move the installer file to the ‘Temp‘ folder in the C drive.
- You can extract the zip file by right-clicking and selecting extract here.
- In the extracted folder, right-click the .exe file and choose Run as Administrator.
- QB Web Connector icon will appear in the system tray after the installation.
After completing the download, the next step is Installation.
Step 2: Install the QuickBooks Web Connector

- Select the desired third-party web-based application from the Application list in the QB Web Connector window.
- Enter the QuickBooks Password that you created in the third-party application.
- Click the Update and select button to start the data exchange.
- Return to the QuickBooks integration screen in the third-party web application.
- Click on the Next button at the end of the Installation and Configuration screen.
Note:
Once the installation is complete, a verification appears in the QuickBooks Integration screen.
Step 3: Set Up by Adding an App to QB Web Connector
- Choose File, Update Web Service, and then click on the Manage Web Apps option.

- Next to the app you want to set up choose or tap on the Set up option . This will take you to the website for the app, where you can log in.
- On the site for the app, click Connect to QuickBooks.
- To finish setting uhttps://ik.imagekit.io/sage/images/home-page/arrow-back.svg?ik-sdk-version=react-1.1.0p QuickBooks Desktop, open it and click Done on the Access Confirmation screen.*-+
You may also see: Top 200+ QuickBooks Integration Add-ons You Must Try
How to Handle Malfunctions During Installation

Suppose you encounter a situation where you experience some malfunction while installing your web connector. In that case, all you need to do is uninstall and reinstall by following the steps given below:
- Press Windows and R together on your keyboard.
- When the Run window appears, access the “Control panel” and then click on OK.
- Step three requires you to choose the “Uninstall a program” option.
- After selecting Web Connector, you can uninstall the Web Connector and then Uninstall. If QBWC doesn’t show up in the Control Panel, you can delete the Web connector folder in the following places:
- C:\Program Files(x86)\Common Files\Intuit\QuickBooks\ or,
- C:\Program Files\Common Files\Intuit\QuickBooks\
Managing Applications
Always remember to log in to QuickBooks as the administrator and to your Intuit Account as well.
- Choose File > App Management > Manage Web Apps.
- Choose Connected apps to see and make changes to your apps accordingly.
Uninstall/Delete App from The Web Connector
Web Connector lets you get rid of applications you don’t require anymore. Once you delete the app, QuickBooks Desktop will no longer be able to exchange data.
Follow the following steps to remove/uninstall an app from QuickBooks Web Connector:

- Click and choose Edit > then Preferences > Integrated Applications.
- Choose the options for the company or company preferences.
- Choose the app you want to get rid of, click “Remove,” and then click “OK.“
Moving Applications on Your Device.
You can move an app for the same company file to a different computer. As soon as you move the app to a new machine, the connection from the other device is withdrawn. Make sure you have the most recent version of QuickBooks Desktop.
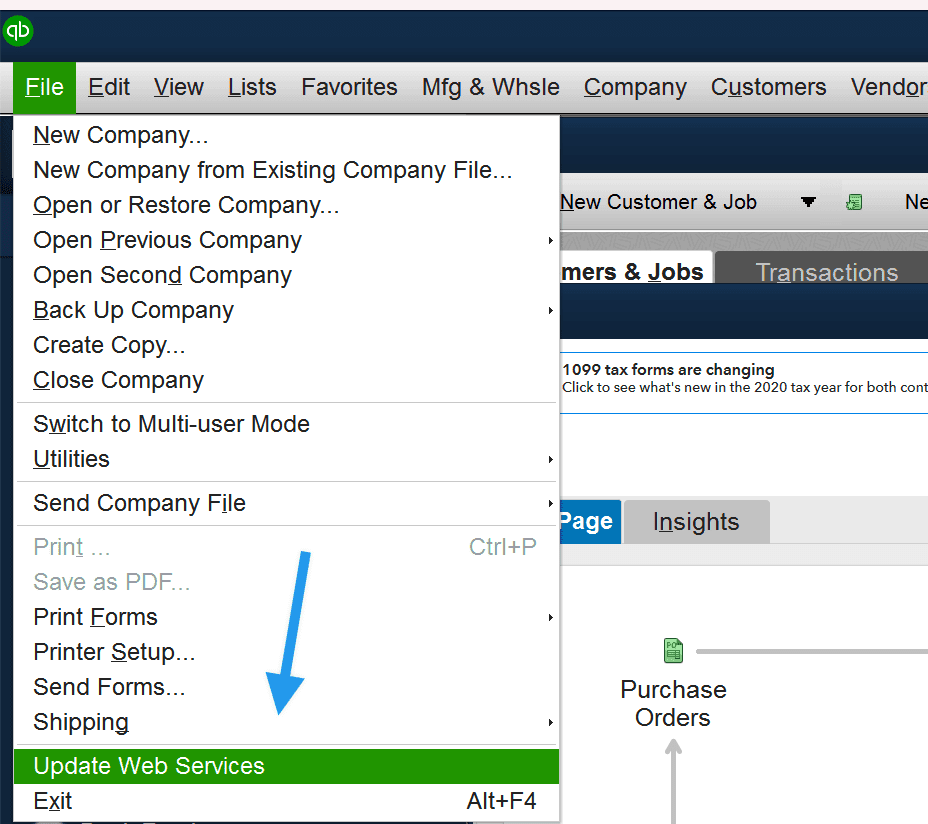
- Click on File>Update Web Service, then Manage Web Apps.
- Choose Connected apps to see and change your apps.
- Choose or opt for the Transfer App to my device option. The connection to the app will move to the new device. Make sure you continue the data transfer.
FAQ’s
Does QuickBooks Web Connector work with QuickBooks online?
QuickBooks Web Connect does not work with QuickBooks Online.
Do I need a QuickBooks web connector?
You must install the QuickBooks Web Connector to send your data successfully.
How do I delete a Web Connector in QuickBooks?
- Click the Start button.
- Search control in the Control Box, then click Control Panel.
- If you are in the Category view, click Uninstall a program. If you are in the Small icons view, click Programs and Features.
- Click Uninstall after the Web Connector has been chosen.
What QuickBooks Versions does Web Connector support?
The QuickBooks Web Connector versions that are 2.1.0.30 and older can be paired with :
- QB Enterprise Solutions
- QuickBooks Premier (2002 or later)
- QuickBooks Pro (2002 or later)
- (2015 or later) QuickBooks Enterprise Solutions
- QB Premier (2015 or later)
- (2015 or later) QuickBooks Pro
- UK editions of QuickBooks Pro or Accountant Edition (2003 or later)
- QuickBooks Point of Sale (v4.0 or later) – QBWC 2.1.0.30 or earlier
Read this also: What Is QuickBooks Point Of Sale? Guide to QuickBooks POS
How to Open QWC File in Web Connector?
- Log in to QuickBooks as the administrator and to your Intuit Account.
- Connect your third-party web app’s.qwc File to QuickBooks if available.
- Choose File, Update Web Service, and then Manage Web Apps.
- Next to the app, you want to set up, tap Set up. This will take you to the website for the app, where you can log in.
- On the site for the app, click Connect to QuickBooks.
- To finish setting up QuickBooks Desktop, open it and click “Done” on the Access Confirmation screen.
How do I Disable/Remove QuickBooks Web Connector?
Mentioned below are the step to uninstall QBWC:
- Navigate towards the Application folder, or hit Command+Shift+A in the OS X Finder to go straight to the /Applications folder.
- Try to locate the QuickBooks folder and then right-click on Exchange Data With Web Services.
- Click on Delete. When asked, click Yes.
- Once you’re done, restart your computer to get the program going again.
Form type is missing in the password QuickBooks web connector
Since the inception of the 2020 tax season, users are required to add a dash and the letter “N” or “M” to their Tax1099 password in the Web Connector. “N” stands for 1099-NEC and “M” stands for 1099-MISC. The letter must be capitalized.
For example, For Tax1099 the password will be Tes6789! If you want to import 1099-NEC forms from QuickBooks Desktop, the password entered by you will be Test6789!-N on your Web Connector. If you want to import 1099-MISC forms, you would enter Test6789!-M as the password.
 Popular Posts