 QuickBooks · Feb 5th 2025 · 7 Min read
Fix QuickBooks Error H505: Cant Access Company File
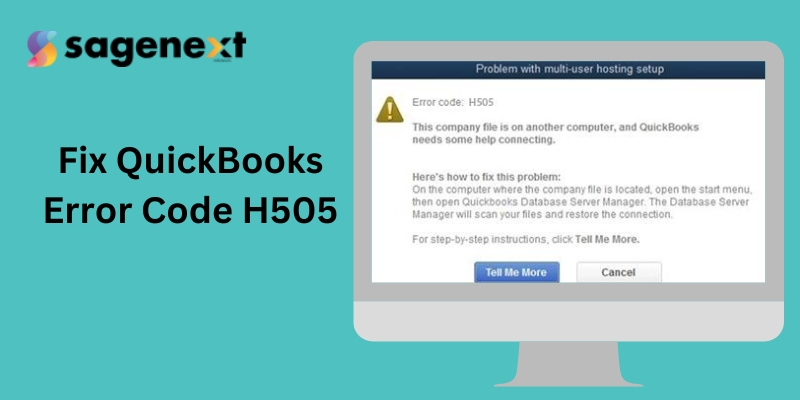
QuickBooks Error Code H505 indicates trouble accessing company files stored on a different computer in a multi-user environment. It essentially means there’s a communication breakdown between your workstation and the server hosting the company file.
Causes Of QuickBooks Error Code H505
- Incorrect hosting settings on the server or workstations.
- Firewall restrictions blocking communication between QuickBooks and the server.
- Network connectivity problems like weak signals or DNS server issues.
- Corrupted network data file (.nd) used for multi-user connections.
- Outdated QuickBooks Desktop application.
Methods to Fix QuickBooks Error Code H505
Method 1: QuickBooks File Doctor Tool
Download QuickBooks File Doctor Tool from the official website. Next, run the installation file and complete the setup process. The QuickBooks File Doctor can resolve the multi-user error and resolve the H-series error entirely.
Method 2: Create a Company file New folder and enable its access
- Initially, create a new folder on your hosting computer.
- Once done, ascertain the windows has the permission to enter in the company file.
- Next, copy the .qbw file into another new folder.
- Lastly, visit the multi-user mode and access the company file.
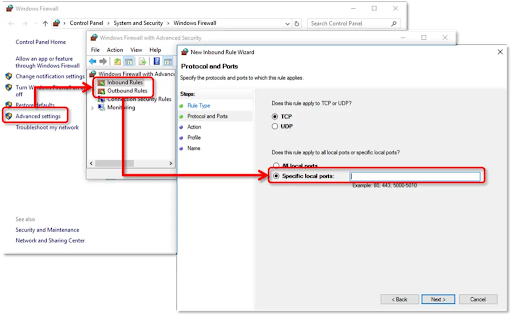
Method 3: Configuring the firewall ports settings
Resolve the error code by configuring your firewall and security setting in the QuickBooks Desktop.
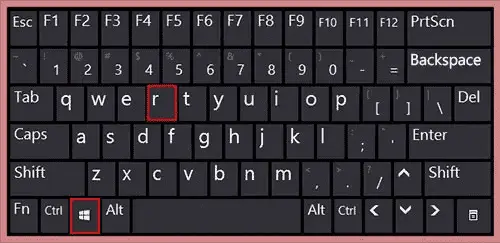
- Access the Run dialogue box with Windows + R keys.
- Within the control panel, select system & security options.
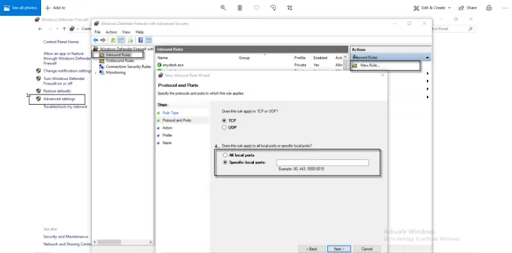
- Now, visit the Windows Firewall and Network Protection.
- Select the Advanced Settings option.
- Hit a click on the Inbound rule and create a New Rule.
Method 4: Configure your QuickBooks hosting settings
-
Verify Hosting
- Restart the software on both servers and run the application on both systems as a multi-user.
- Go to the File menu and open the utility option.
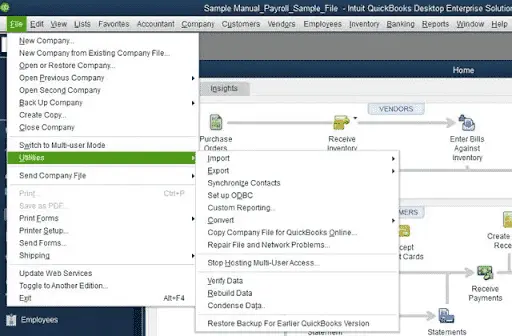
- Disable or stop hosting the multi-user access configuration.

- Turn on hosting through a file in one system, and navigate to the “Utilities” tab.

Verify QuickBooks services
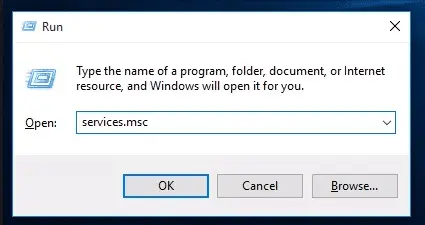
- On the run command box, type MSC and find Services.msc in the box.
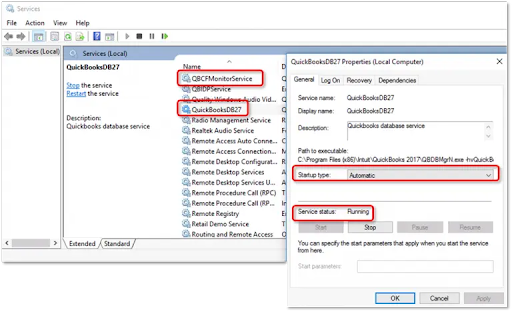
- Search for the QuickBooksDBXX service and select QuickBooksDBXX service.
- Further, do the startup in Automatic mode.
- Click on the recovery option.

- Once finished, restart the QuickBooksDBXX service and repeat the same process.
- Repeat the same process for the QBCFMonitorService.
- Run the solution in multi-user mode on each affected digital system.
- Finally, search for the QuickBooksDBXX service that is a member of the admin cluster and has agreed to the permissions, in case of any issue.
- Click on port and visit the Next tab.
- Make sure to select the right TCP Option.

- Further, type the QB Desktop’s year version port.
- Restart QuickBooks Desktop to finish the process.
Method 5: Modify the system’s firewall settings & create exceptions

- Move to the control panel settings and click on the firewall settings.
- Select allows a program through the system’s firewall.

- Once finished, choose the add program tool, and then add the QuickBooks 20xx to your exception list.
- After that, reboot the PC to apply the changes.
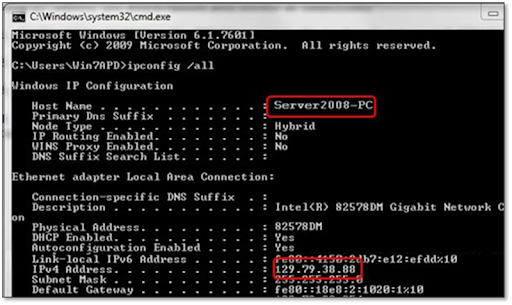
Method 6: Edit the Host file
Step 1: Search for the IP address and system name of the Server & Workstation
- Go to the Run box and enter cmd and open the command box.
- Enter cmd and run the Command Prompt window.
- Further, enter ipconfig/all and write your hostname and IP address.
- Repeat the same process for multi-user.
Step 2: Edit your Windows hosts file
- Close the QuickBooks and follow the file path: C:\Windows\Systems32\Drivers\Etc or C:\Windows\Syswow64\Drivers\Etc.
- If you’re unable to view, select the View tab and tap on the hidden items to view the hidden files.
- Fill out the IP Address and system name.
Note: While entering the details, ascertain to use the Tab key, rather using the spacebar to enter spaces.

- Save the changes and open QuickBooks software in multi-user mode.
Read Also: Fix QuickBooks Error H202
Conclusion
While QuickBooks Error Code H505 can be frustrating, it doesn’t have to bring your multi-user workflow to a halt. By understanding the common causes – improper hosting settings, restrictive firewalls, network connectivity problems, or outdated software you can take targeted troubleshooting steps.

