 Windows Server · Feb 23rd 2026 · 7 Min read
How to Fix the Sharing Tab Missing Issue?
Folder sharing is important for creating a network drive and for working over a network with multiple users. Windows has offered users the ability to share files and folders for a very long time. The Sharing tab is by default located in the Properties window. From this window, you can create a shared path and also set advanced sharing permissions.
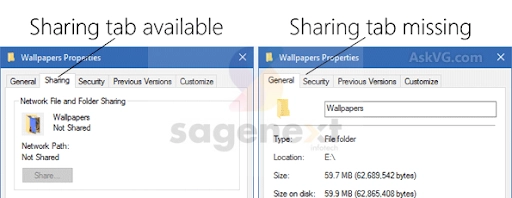
On rare occasions, the sharing tab might not show up in the Properties tabs and the user is no longer able to create any shares for other users to access. In given image shows a situation where the sharing tab is both available and missing.
In case, you are also facing a situation where your sharing tab is missing or you’re unable to create any share- users are advised to follow the steps mentioned below to achieve successful results.
Often Microsoft users are seen searching terms like “Windows 11 sharing tab missing” or “Windows 10 sharing tab missing” or “security tab missing windows 10”.
The “Shared” tab missing issue can occur on Windows systems and prevent you from sharing files and folders.
Causes of Shared Tab Missing Issue
- Required services not running.
- Incorrect group memberships.
- Sharing Wizard enabled.
- Corrupted system files.
- Third-party apps or antivirus interference.
- Windows updates bug.
Methods to Fix the Shared Tab Missing Issue in Folder Properties
Method 1: Registry Fix
- Press Windows Key + R to open the Run prompt.
- Type regedit and press Enter to open the Registry Editor.
- Navigate to the following key: HKEY_CLASSES_ROOT\Directory\shellex\PropertySheetHandlers\Sharing

- If the Sharing key is not present, you need to create it. Right-click on PropertySheetHandlers, select New, then Key, and name it Sharing.
- Right-click on the newly created Sharing key, select New, then DWORD (32-bit) Value. Name it Default and set its value data to {81e9010-6ea4-11ce-a7ff-00aa003ca9f6}.
- Close the Registry Editor and restart your computer.
Methods 2: Check Required Services
- Press Windows Key + R, type services.msc, and press Enter to open the Services window.
- Look for the following services:
- Function Discovery Provider Host
- SSDP Discovery
- Remote Procedure Call (RPC)
- Ensure all these services are Running. If not, right-click on each service, select Start, and set their Startup type to Automatic.
- Restart your computer.
Method 3: Enable Sharing Wizard
- Open File Explorer.
- Click View, then select Options.
- Switch to the View tab.
- Under Advanced settings, find Use Sharing Wizard (Recommended).
- If it’s not checked, click to select it.
- Click Apply and OK.
- Restart your computer.
Additional Methods to Fix Sharing Tab Missing Issue
- Run System File Checker (SFC) and Deployment Image Servicing and Management (DISM): These tools scan and fix corrupted system files that may be causing the issue.
- Check if Sharing is disabled by Group Policy: If you’re on a domain network, group policy might be disabling the sharing feature.
- Create a new user account: Sometimes a corrupted user profile can cause this issue. Creating a new user account can fix it.
- Update your Windows system: Updating to the latest Windows version can fix bugs and glitches that may be causing the problem.
Read Also: change the User password on a Windows server
Conclusion
In conclusion, the missing “Shared” tab can disrupt file and folder sharing within your network. Thankfully, various methods exist to address this issue, including registry fixes, service checks, enabling the Sharing Wizard, and additional solutions like SFC and DISM scans, group policy checks, new user accounts, and system updates.
By implementing these fixes, you can regain the functionality of the “Shared” tab and resume sharing files and folders seamlessly across your network. Remember, seeking technical support can be helpful if the issue persists.
FAQs
What is a location tab?
The Location tab is a feature found in the Properties window of certain folders in Windows, such as Documents, Desktop, or Downloads. It allows you to view, change, or move the folder’s storage location to another drive or directory. This is especially useful if you want to save files to a different disk (like moving from C: to D:) or redirect user data to a network location for better organization and backup.
Where is the sharing tab?
The Properties window is where you’ll find the Sharing tab, where you can create a shared path, adjust advanced sharing permissions, and more. If the Sharing tab is missing from the Properties window, you won’t be able to set up any shares for other people to use.
Where are shared documents in QBO?
Shared documents in QBO are found within each individual client’s details. Simply select the client you want from the list, then click the “Shared Documents” tab along the top navigation bar. Here you can upload, manage, and share documents with your client all in one location.
How do I remove the share tab from File Explorer?
To remove the Share tab from File Explorer, open File Explorer, click on “View,” then “Options.” In the Folder Options window, go to the “View” tab, scroll down to “Advanced settings,” and uncheck “Show the Share tab in the ribbon.” Click “Apply” and then “OK” to save the changes. This action will remove the Share tab from the File Explorer ribbon interface.

