 QuickBooks · Feb 5th 2025 · 7 Min read
Fix QuickBooks Windows Administrator Permissions Needed Issue
QuickBooks relies on Windows administrator permissions to perform certain tasks seamlessly. If you receive the error message “This action requires Windows administrator permissions” while using QuickBooks, it means that your current user account does not have the required privileges. While opening QuickBooks desktop company files you can receive a pop-up message. It will ask for the Windows administrator permissions for running the dbmanagerexe.exe.

Solutions to fix QuickBooks Windows Administrator Permissions Issue
Solution 1: Disable the multi-user mod
- Connect to your server.
- Open the impacted version of QuickBooks.
- Move to the File and then to Utilities.
- Click on Stop hosting.
- You can also enable the multi-user mode after a user logged in via credentials.
Solution 2: Run QuickBooks as Administrator Permissions
- Right-click on the QuickBooks shortcut or executable file (e.g., “qbw32.exe” or “QuickBooks.exe”).
- Select “Run as administrator” If prompted, provide the administrator password or confirmation.
Solution 3: Restart The Database Manager
- Move to the Start menu and start the Quickbooks Database Server Manager.
- Navigate to This PC and then on the Local Disc – C: \
- Tap on the Start Scan

Solution 4: Add QuickBooks database accounts on the local admin group
- Connect to the server.
- Right-click on the Start menu and go to Computer Management.
- Visit the Local Users and Groups and select the Groups.
- Click on the Administrators and include QB Database Accounts under the admin group.
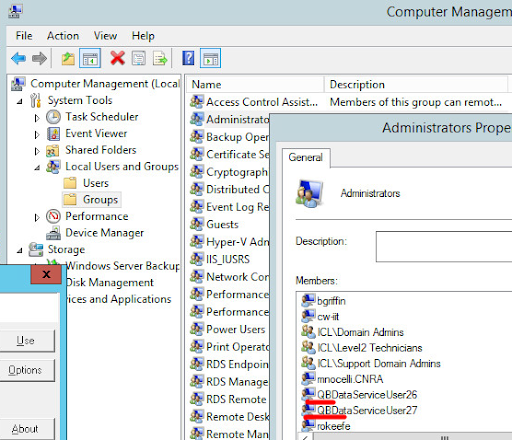
Tip: Users can look for the list of QB database user accounts under the “Users” group in the same path.
- To add the accounts:
- Go to the location and modify it to the server name.
- Remember to type the same name i.e, inclusive of caps and bold letters.
Solution 5: User Account Control (UAC)
- Ensure that User Account Control is enabled.
- Search for “UAC” in the Start menu and verify that it’s set to an appropriate level (recommended is the default setting).
- If it’s turned off, consider turning it on.
Solution 6: Adjust Folder and File Permissions
- If you have issues with specific company files or folders, check and modify their permissions.
- Right-click on the folder containing your QuickBooks company files and select “Properties“
- Navigate to the “Security” tab and review the permissions.
- Add your user account with Full Control if it’s not listed.
Solution 7: Adjust the QuickBooks Services to “Delayed Start”
- Join the server under which the QuickBooks application is installed.
- Next, open the services from the run window.
- Search for the QBCFMonitorService.
- Click on the Startup type and tap on the Delayed Start.
- Repeat the same process for the QuickBooks Database Service.

Solution 8: Create a New QuickBooks User
- As a last resort, you can try creating a new user in QuickBooks.
- Go to “Company” > “Users” > “Set Up Users and Roles.”
- Add a new user with admin rights, and see if the issue persists with the new user.
FAQs
How to fix the problem of administrator permissions in Windows 10?
To fix administrator permission issues in Windows 10, you can try the following steps:
- Right-click on the file or program that requires administrator permission.
- From the context menu, select “Run as administrator.”
- If prompted, enter the administrator password or provide confirmation.
- If the issue persists, try disabling the User Account Control (UAC) temporarily.
- Open the Control Panel and search for “UAC” in the search bar.
- Click on “Change User Account Control settings.”
- Move the slider to the lowest level (“Never notify“) and click “OK.”
- Restart your computer.
How to give administrator permissions in Windows 11?
To give administrator permissions in Windows 11, follow these steps:
- Click on the Start button and select “Settings”.
- Click on “Accounts” and select “Family & other users.“
- Under the “Other users” section, click on the user account to which you want to grant administrator access.
- Click on “Change account type” Select “Administrator” and click on “OK“.
- The user account will now have administrator permissions in Windows 11.

