 Printing . May 30th 2024 . 7 Min read
How do I Print to My Local Printers from My VPS?
Printing from a Virtual Private Server (VPS) to your local printers can be achieved through a few configurations. It is important to ensure that users consider the following factors before being able to print items from their server.
Recommendations Before print from your local printer:
- Users must ensure that their local printer is working normally.
- Users must required drivers for the local printer are installed on the remote server.
- If you go through multiple layers of Remote Desktop Printing (or RDP), the drivers for the local printer are required to be installed on the server at each level or layer
- user must ensure that the Printers option is checked from the Local Resources tab of the Remote Desktop client that the user is operating.
Local System Configuration:
- Click the Start button and navigate to Control Panel > Devices and Printers and then Click.

- Right-click on the Micrososft Print to PDF and select Printer Properties.

- In the Ports tab, tick LPT1.
- Enable printer pooling and then click OK .

Configure Remote Desktop Client
- Open Remote Desktop Connection.
- Click Show options and navigate to the Local Resources tab.

- Check the Printers checkbox and click on More.
- Tick Ports and press Save in the General Tab before connecting to your server.

VPS Configuration
- Log in via RDP: Connect to your VPS using Remote Desktop Protocol (RDP).
- Install Printer Driver: Download and install the required printer driver for your local printer from the manufacturer’s website.
- Add a Local Printer:
- Open Control Panel > Devices and Printers.
- Click Add a Printer.

- Select The printer that I want isn’t listed.

- Select Add a local printer or network printer with manual settings and click Next.

- Open Control Panel > Devices and Printers.
- Configure Print Port:
- Click Use an existing port and select TS001: (usually corresponds to the LPT1: port redirection and click Next).

- Click Use an existing port and select TS001: (usually corresponds to the LPT1: port redirection and click Next).
- Choose Driver: Search for and select the appropriate driver you previously downloaded. Click Next.

- Replace Driver (Optional): If necessary, click Replace the current driver and click Next.

- Set Printer Name: Enter a desired name for the printer.
- Do Not Share: Select Do not share this printer and click Next.

- Print Test Page: Click Print a test page to ensure proper configuration.

Start Print Spooler Service
- Click Start > Run, type services.msc, and press Enter.

- Locate Print Spooler Service, right-click it, and select Properties.
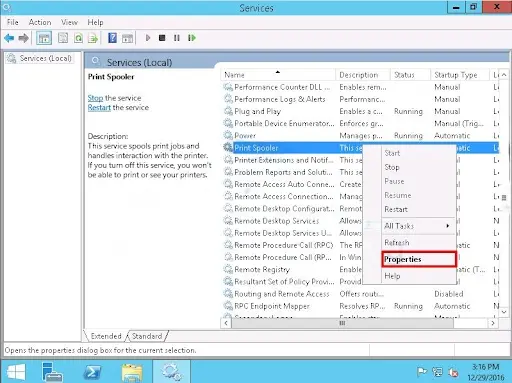
- Click Start to activate the service.
- Change the startup type to “Automatic,” then proceed to click on “Apply” followed by “OK.

- Close the Services console.
Restart Print Spooler Service
- Connect to your VPS via RDP.
- Repeat steps Start Print Spooler Service of above to access the Print Spooler Service properties.
- Click Restart and then OK.

- Log Out and Log In: Sign out of your VPS (without closing the RDP window) and log back in.

- Your local printer should now be redirected and accessible from your VPS.
Additional Notes
- Ensure your local printer is connected and powered on.
- Download the correct driver for your specific printer model.
- The LPT1 port may differ depending on your configuration.
- Restarting the Print Spooler service may be necessary after each configuration change.
By following these steps, you can successfully print to your local printer directly from your VPS, improving your workflow and productivity.
Read Also: How to Fix QuickBooks Error 179?
FAQs
Can I print to my local printer from Remote Desktop?
Yes, you can! Configure your local system to share the printer and enable LPT1 port. On your VPS, install the driver and add the local printer manually. Set the port to TS001 (LPT1 equivalent). Finally, restart the Print Spooler service. Enjoy printing from your VPS to your local printer!
How do I connect my local printer to my server?
- On your local system, enable LPT1 and printer pooling in your network printer settings.
- In Remote Desktop Client, check “Printers” and “Ports” under Local Resources.
- On your server, install the local printer driver and add it manually.
- Choose “Use an existing port” and select “TS001:” (usually corresponds to LPT1: redirection).
- Set printer name and don’t share it.
- Start and set the “Print Spooler Service” to “Automatic” on both systems.
- Restart the service on the server.
- Log out and log back in – your local printer should be accessible!
How do I print from VDI to local printer?
Printing from VDI to your local printers requires configuration on both sides. On your local device, enable printer pooling and LPT1 port. In the remote desktop client, check the “Printers” checkbox. On your VDI, install the printer driver and add it as a local printer using the TS001 port. Finally, set the Print Spooler Service to start automatically and restart it. After these steps, your local printer should be accessible from your VDI.
 written by
