 QuickBooks · May 30th 2024 · 7 Min read
How to Create and Manage New Users in QuickBooks?
Creating and setting permissions for new users in QuickBooks is an essential step in maintaining data security and ensuring that only authorized individuals have access to sensitive financial information. Here’s a concise guide on how to accomplish this task:
Creating a New User
- Log in as an admin user to your QuickBooks company file.
- Navigate to the Company menu and select Users → Set Up Users and Roles.

- In the User List dialog box, click Add User.
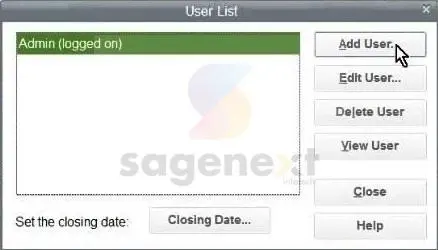
- Enter the User Name, Password (optional), and Confirm Password.

- Click Next.
- Select the Access for Users:
- All Areas: Grants access to all areas of QuickBooks, except those requiring administrative access.
- Selected Areas: Allows you to specify which areas the user can access.

- Review the authorization settings for each area.
- Click Next.
- Choose the data access restrictions
- Create transactions only: Limits the user to creating transactions.
- Create and print transactions: Allows the user to both create and print transactions.
- Create transactions and create reports: Grants the user the ability to create transactions and generate reports.
- Click Finish.
By following these steps, you can effectively create new users in QuickBooks and grant them appropriate access permissions, ensuring that your financial data remains secure and accessible to authorized personnel.
Conclusion
By creating new users in QuickBooks and carefully setting their permissions, you can effectively manage access to your financial data and maintain the integrity of your accounting records. This process helps protect sensitive information, prevent unauthorized changes, and ensure that only authorized personnel have access to specific areas of your QuickBooks data.
FAQ’s
What are the different types of user roles in QuickBooks?
QuickBooks offers various predefined user roles, each with a set of permissions:
- Admin: Full access to all QuickBooks functions.
- Standard User: Access to common QuickBooks tasks, such as creating and editing transactions.
- Reports Only: Limited access to viewing and printing reports.
- Custom Roles: Create unique roles with customized permissions tailored to specific needs.
How can I restrict access to sensitive data in QuickBooks?
By assigning appropriate permissions to users, you can control their access to sensitive data. For instance, you can restrict access to confidential customer information or prevent unauthorized changes to financial records.
How can I monitor user activity in QuickBooks?
QuickBooks provides user activity logs that track user actions within the software. These logs can be reviewed to detect any unauthorized or unusual activity.
How often should I review user permissions in QuickBooks?
Regularly review user permissions to ensure they align with current job roles and responsibilities. This is especially important when employee roles change or new users are added.
What are some best practices for user management in QuickBooks?
Implement strong password policies, limit admin access, monitor user activity regularly, and periodically review permissions to maintain data security and prevent unauthorized access.
How can I reset a user’s password in QuickBooks?
To reset a user’s password, log in as an admin user and go to the Set Up Users and Roles section. Select the user you want to reset the password for and click the Edit button. In the User Information window, click the Reset Password button and follow the prompts to create a new password for the user.

