How To Enable Inventory Feature In QuickBooks
Table of Content:
- Enable Inventory in QuickBooks Desktop
- Advanced Inventory Feature in QuickBooks Enterprise
- Enable Inventory Feature in QuickBooks Online
- Inventory Function on QuickBooks Desktop for Mac
- FAQs
Being a small or medium-sized business, it is very much possible that you have to deal with a number of aspects such as managing inventory and payroll. Indeed, managing inventory is a very critical and problematic area for most businesses in today’s context.
In order to serve the customers timely and effectively, it is necessary to track and manage inventory carefully. This could be accomplished by having stringent procedures. As a result, users need to review the fundamentals to be able to add inventory features in QuickBooks.
If you want to track the Inventory of your business, you can use the item list. It is to be noted that to access this feature, you first need to activate the QuickBooks inventory feature. Once you activate the feature, you can easily add the accounts that are needed for inventory to your list of accounts.
Steps to Enable Inventory in QuickBooks Desktop
Here’s how you can activate the Inventory Feature on QuickBooks Desktop.
Step 1: Access your company files for your ‘QuickBooks Desktop account’.
Step 2: You need to navigate towards the ‘Edit menu’ and select ‘Preferences’ from the menu that appears.
Step 3: Select the ‘Items & Inventory’ section on the left menu and access the ‘Company Preferences tab’.
Step 4: Activate Inventory and purchase orders options by turning them ‘On’.
Step 5: After completing the above steps, select and click on the OK button.
How to Activate Advanced Inventory Feature in QuickBooks Enterprise
Follow the given steps to enable advanced inventory feature in QuickBooks Enterprise.
1. Go to the menu button and select ‘Edit’ as shown in the image below and select ‘Preferences’.

2. Now, you will see the ‘Preferences’ dialog box in the left pane, thereafter, click on highlighted ‘Items & Inventory’ and then select the ‘company preference tab’.

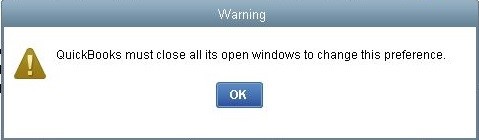
3. In the company preferences tab, click the ‘Inventory and purchase orders are active’ checkbox.

4. After the above step, click ‘OK’ when QuickBooks notifies you to close open windows.
Steps to Add an Inventory Item in QuickBooks Enterprise
- First, go to the ‘Home’ page, and then click the ‘Items & Services’ icon.
- In the ‘Item & Services’ list, click on ‘Item’ and select ‘New’.
- Next, select the ‘New Item’ dialog box and select ‘Inventory Part’ from the ‘TYPE drop-down’ list.

- From the ‘Item Name/Number field’, simply type an identifier for the chosen item.
- In the tab ‘Income Account’ field, simply add or select the Income account to manage income for the item.
- Complete other required fields, and click ‘OK’ when finished.
Enable Inventory Feature in QuickBooks Online
The following passage will guide you through the process of enabling your inventory feature in QuickBooks Online.
Step 1: Sign into QuickBooks and proceed toward the ‘Settings’ section.
Step 2: Then, choose the ‘Account and settings’.
Step 3: Click on the tab labeled ‘Sales’.
Step 4: Click on the ‘Edit’ tab in the ‘Products and services’ section.
Step 5: Remember to switch on the ‘Show Product’ feature in the Service column section.
Note:
If you wish to set up variable pricing for the items you sell, you may also activate price rules.
Step 6: Make sure to track quantity and price/rate, and inventory quantity on hand are both turned on.
Step 7: Choose the Save option, and then click Done.
You may also like: Comprehensive Guide on QuickBooks Online You Must Read in 2022
How to Turn Inventory Function on QuickBooks Desktop for Mac
QuickBooks’s 2022 software version for Mac uses automotive inventory management to track the cost of items. Inventory tracking on Mac-based devices is hassle-free as the OS automatically computes the prices of merchandise sold in every invoice and calculates the total cost of the ending inventory. Hence eliminating the need to track primary expenses of the processed items.
Read this also: Detailed Guide on QuickBooks for Mac for 2022
To create an item in QuickBooks for Mac, follow the steps provided below:
Step 1: Choose Lists from the ‘Main Menu’ to access your lists.
Step 2: Click on the ‘Items tab’.
Step 3: Then, the Item List window will show up. To add more, click the Plus ‘+ icon’.
Step 4: Choose the ‘New Item’ option.
Step 5: Pick the ‘Items’ you want to create from the options provided.
Step 6: Make sure to mention the necessary information for the item. You have the option of using the ‘Custom Fields’ feature to generate new fields based on your individual preferences.
Step 7: Click on ‘Save’.
Steps to Add New Items in QuickBooks for Mac (Existing Inventory)
QuickBooks allows you to modify the information you previously entered for a particular item. In order to make changes to your existing inventory or add new items in QuickBooks for Mac, follow the procedures below.
Step 1: Select ‘Items’ from the drop-down menu under ‘Lists’.
Step 2: Launch the item for which you wish to change the information you have stored.
Step 3: Make the necessary changes in the window labeled Edit Item.
Step 4: Select the Ok button.
Conclusion
So in simple words, the QuickBooks inventory management feature is effortless to operate due to its highly user-friendly interface. The steps mentioned above help users switch on their inventory feature and guide them towards shutting this feature down and making adjustments to the inventory itself. If you are still unable to fix inventory related features get in touch with our QuickBooks experts.
And want to know more about the various features of QuickBooks? You can directly contact us at-: 1-801-610-6141. You can even mail us at Support: support@thesagenext.com.
FAQs
Can QuickBooks track Inventory
Yes, all QuickBooks software comes with inventory management features to make product tracking and inventory management a piece of cake.
Does QuickBooks Allow Inventory Management
QuickBooks’ integrated Inventory Management Software allows you to keep track of stock and locate items quickly. This feature keeps tabs on stock, sets up notifications for when you need to restock, and gains valuable insights on your purchasing and selling patterns.
What QuickBooks Cannot Do With Inventory
Some of the limitations of QuickBooks inventory are:
- Problems with overseeing a network of distribution centers.
- stock availability that isn’t updated in real time across many online marketplaces.
- Immature for managing complex orders.
- Using Excel, doing everything by hand, and making mistakes are all examples of inefficient and error-prone processes.
- Deficient capacity for reporting.
How do I Start Inventory Feature in QuickBooks Desktop
Turning on inventory is the initial stage in the process of tracking inventory.
- Click the ‘Edit Preferences’ button.
- After that, pick the ‘Corporate Preferences’ as well as the ‘Inventory Items’
- Then select the ‘Checkbox’ to activate inventory
How do I Turn Off Inventory in QuickBooks
To turn off inventory feature in QuickBooks follow the steps given below:
- Select ‘Preferences’ from the ‘Edit’ menu.
- Choose ‘Items & Inventory’, then navigate towards the ‘Company Preferences’ tab.
- Click on the ‘Advanced Inventory Settings’ button.
- Then you can Turn off each feature that’s in use.
- Click on ‘OK’ in the ‘Advanced Inventory Settings’ section
- Remember to click on ‘OK’ in both the ‘Preferences’ and the warning window.
How to Adjust Inventory in QuickBooks
Users can edit their adjust inventory inputs by following the process given below:
- Select the Gear symbol.
- Then click on Products and Services below the Lists section.
- Select the Edit option on the item.
- Select Starting value in blue text.
- You’ll get a prompt that says this step will change the starting value of the item, click Got it.
- Then users need to update the Initial quantity on hand.
- In the Memo area, type a note describing the modification.
Then to finish the process, click on Save and close.
 Popular Posts