
Install And Configure The QuickBooks On A Server For Multiple Users
QuickBooks is one of the efficient management solution tools that offers multiple business benefits. By installing and configuring the QuickBooks on a server, multiple users can access the same application on different devices. However, one criterion requires it to be strictly adhered to – they need to have a valid license to use the software.
Moreover, If the users have installed the QuickBooks Database Server, they can log in and use the same QuickBooks file. Also, a multi-user mode in QuickBooks software helps scan the computer to get updated files and configure new files that are synced with authorized systems.
For installing the QuickBooks on Server, you will have to:
- Install the QuickBooks Database Server
- Configure QuickBooks Database Server Access
Note: The steps to install and configure QuickBooks Desktop on a server are the same for different versions i.e. QuickBooks Pro, Premiere, and Enterprise.
Steps to Install and Configure QuickBooks on a Server
Below we have compiled the installation and configuration process of installing QuickBooks on a server for multiple users.
Step 1. Install the QuickBooks Database Server
- Click ‘Alt+F4’. Close all the currently running software/programs on your system.
- Insert ‘QuickBooks software CD’ into your drive to start the installation process.
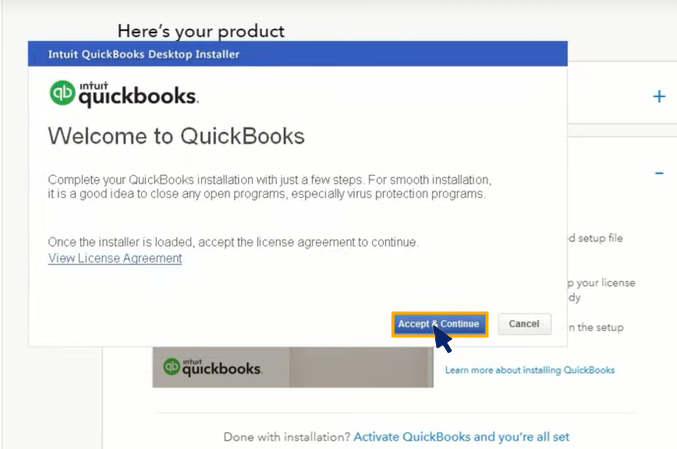
- Click ‘Next’ and Agree to the ‘License Agreement’.
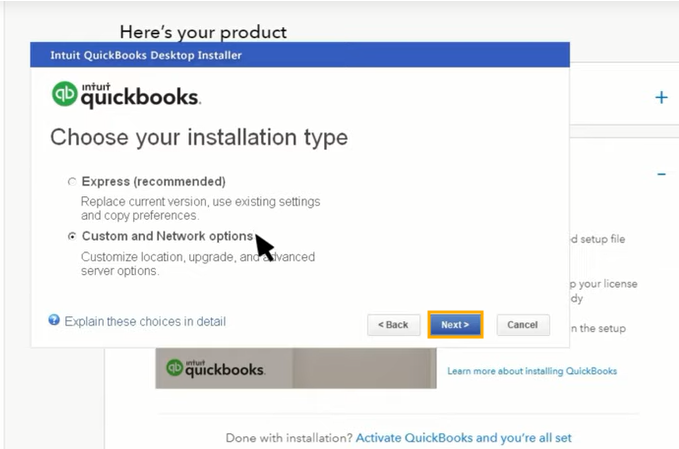
- Choose ‘Custom and Network Options,’ which does not require a license initially. This will allow the sharing of company files over the network.
- Click on ‘More Than One User’ and then select ‘Install Server Database Only’.
- Follow the mentioned instructions guiding the installation process. Select the option that allows other computers to open files on this system. Now click ‘Next’.
- Press ‘Install’ and click ‘Finish’ to open QuickBooks.
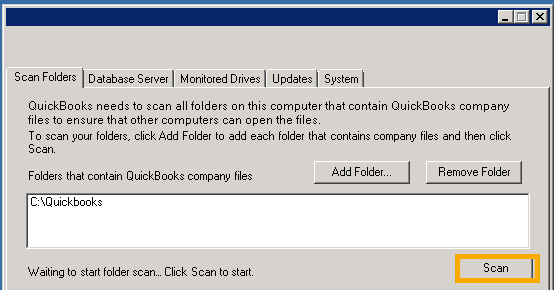
- In the QuickBooks Database Server Manager, click ‘Scan Folders’.
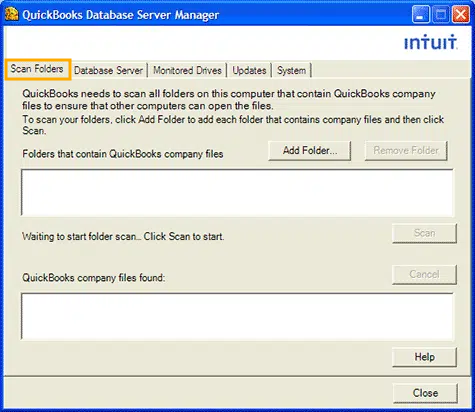
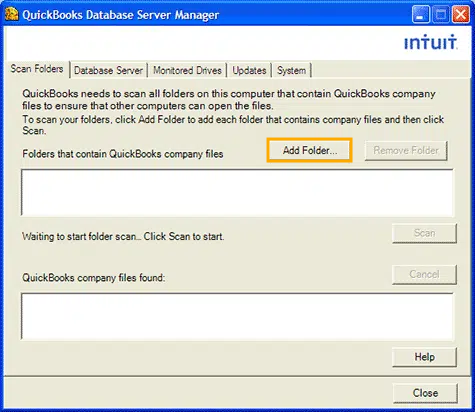
- Select ‘Add Folder’ and then choose the folder where the company file is stored so that other users can open the company files remotely. You can also scan all the folders if you are not sure.
- Now click ‘Scan’ and then ‘Close’.
Also read: How To Fix Common QuickBooks Desktop Install Errors
Step 2. Configure QuickBooks Database Server Access
Once you have installed the QuickBooks Database, it is time to configure it.
Here are the steps to follow:
- Go to QuickBooks, click ‘File’ and then ‘Utilities’.
- Now click on ‘Host Multi-User Access’ on the same computer where you want to use administrator access.
- Select ‘Company’ and ‘Set Up Users and Passwords’.
- Choose a proper ‘Username and Password’ and add them. Also, select the ‘Access and Changing/Deleting Option’ for the users.
- Click ‘Finish’.
- Open QuickBooks on all the computers connected to a single network.
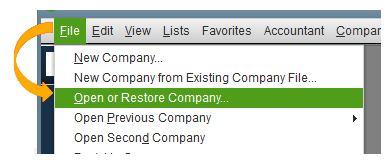
- Click on ‘File’ and ‘Open and Restore’ Company.
- Click on the option ‘Open a company file’ and then click ‘Next’.
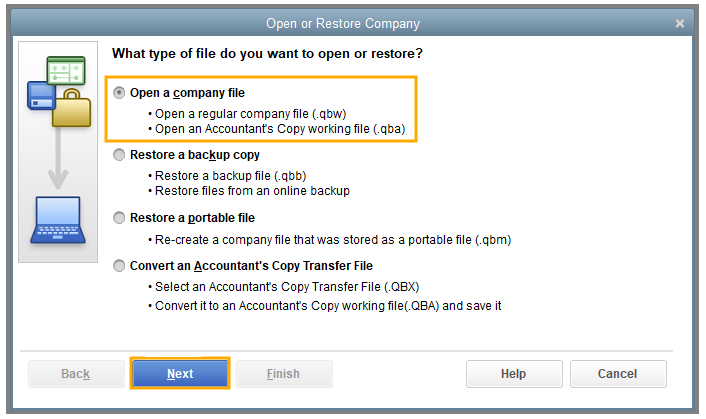
- Select the ‘QuickBooks Database Server Management file’ and click ‘Open’.
- Enter the ‘Password and Username’ assigned to each computer and ‘Log in’.
Conclusion
Accessing files from multiple computers is a benefit in itself for Accountants, CPAs and SMBs owners. Nowadays, accountants prefer virtual server-based QuickBooks as it grants remote working which enhances productivity
By following the instructions mentioned in the blog, QB users can easily set up QuickBooks on a server for multiple users without location limitations, just with an active internet connection.
FAQs
Can I Install QuickBooks Pro on Multiple Computers
After you host QuickBooks Pro on a server you can install it on different computers. Moreover, QuickBooks Pro has multi-user collaboration which allows multiple users to collaborate at one time.
 Popular Posts


 written by