 Microsoft office . Jun 25th 2024 . 7 Min read
How to Block IP Address in Windows Firewall
Your Windows server has a Windows firewall which safeguards your system from malicious attacks. The firewall identifies if anything attempts to access your server and compares it with a set of rules. If it isn’t according to the rules or breaks the rules, your firewall doesn’t let the traffic through.
Your firewall can also block certain IP addresses from connecting to your server. On a Windows server, you do this by logging into your server via RDP and creating a new firewall rule listing the IP addresses you want to block.
In case you also want to block a specific IP in Windows Firewall, you will need to follow the below steps in order to achieve the best results.
Follow These Steps To Block IP Address In Windows Firewall:
Step 1: Open Windows Firewall with Advanced Security
- First, navigate to the Server Manager and move to the dashboard.
- At the top right corner, click on the tools option. It will open a submenu.
- Now, look for the option Windows Firewall with Advanced Security and click on it.

Figure 1.1
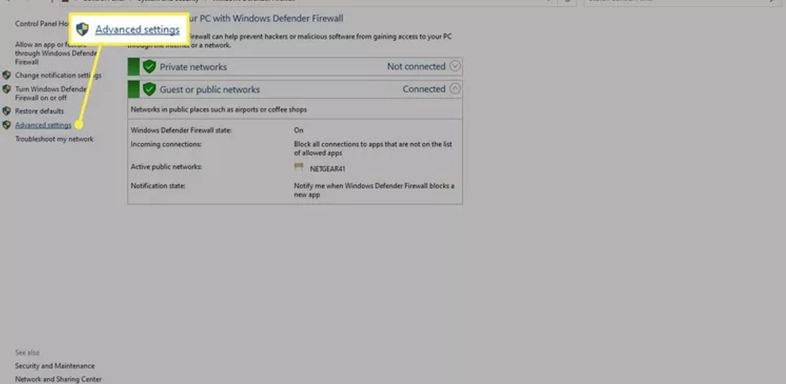
Figure 1.2
Step 2: Create a New Rule
- Once you’ve entered the Window Firewall Advanced Security box, select the Inbound Rules option at the left panel.
- Once clicked, select the New Rule option as shown below in Figure 1.3
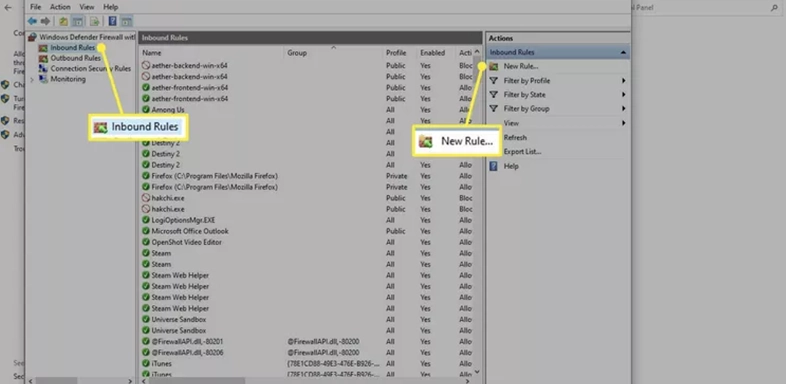
Figure 1.3
Step 3: Select Custom in Rule Type
- Once you enter the Inbound Rule box, select the Rule Type option.
- Click on the Custom option as illustrated below in Figure 1.4.

Figure 1.4
Step 4: Select “All Programs”
- Select all Programs under Does this Rule Apply to All Programs or a Specific Program?
- Once selected, choose the Next option to move ahead in the process.

Figure 1.5
Step 5: Select Any on the Protocol and Ports Screen
On the Protocol and Ports screen, choose the Any option and select the Next option to move further.
Step 6: Click Add as Noted on the Red Outline Squared to Add Special IP or IP Range
- On the Scope option, click on any IP address on which local IP address this rule applies to?
- Choose the option of these IP addresses and then Add on the next question and click on the Next button to continue further. As shown in Figure 1.6.

Figure 1.6
Step 7: Add the Special IP or IP Rage
Users will now have to add the special IP on the provided box of This IP address. As illustrated below in Figure 1.7
Figure 1.7
Step 8: You can add more IPs to block here
If required, users can also add more IPs by clicking the Add option. Once completed, click on the Next button to move further in the process.

Figure 1.8
Step 9: Select “Block the Connection”
On the Action window, the user will have to select the Block the Connection option. Once selected, choose the Next option to proceed further.
Step 10: Select all options under “When does This Rule Apply?”
After clicking on the Next option, you will get the new window of Profile with three options. You will have to choose three options: Domain, Private, Public.

Step 11: Set a name for the rule
On the Name window, set a name for the rule and choose the finish option.

Step 12: Done
After following the steps, you will be able to successfully block an IP in Windows Firewall.
Also Read: How to Access Desktop Server on Mac
Conclusion
Blocking specific IP addresses using Windows Firewall is an essential practice for enhancing your server’s security. By following the detailed steps provided, you can effectively prevent unauthorized access and protect your system from potential threats. Implementing these steps ensures that your server remains secure and operates smoothly, safeguarding your data and resources from malicious activities.
FAQs
How do I block access to addresses in Windows?
To block access to addresses in Windows, use the Windows Firewall with Advanced Security. Open it from the Server Manager’s Tools menu, create a new inbound rule, select “Custom” in Rule Type, and apply it to all programs. Then, add the IP addresses you want to block under the Scope section, select “Block the Connection,” apply the rule to all profiles (Domain, Private, Public), name the rule, and finish the setup.
Can my IP address be blocked?
Yes, your IP address can be blocked. Firewalls, including Windows Firewall, can be configured to block specific IP addresses from accessing a server or network, preventing any traffic from those IPs from passing through.
 written by
