 QuickBooks · May 30th 2024 · 7 Min read
Fix The QuickBooks There is not Enough Space Issue
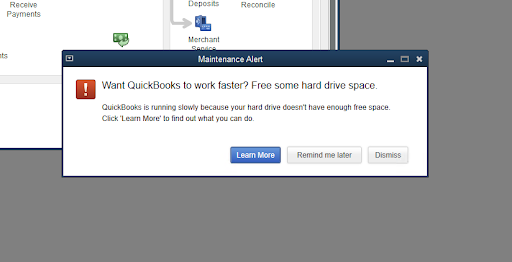
While using QuickBooks, a common issue occurs with the company file due to a lack of storage on the computer. A dialog box will pop up on the screen and request the user to free up space on the hard drive to help QuickBooks work faster on the system.
As a rule of thumb, QuickBooks requires around 15 percent of the total space on the hard disk drive to be free to function efficiently. If you are receiving this error on your QuickBooks application, you must ensure that your hard disk drive has enough free space to allow QuickBooks to work faster. Almost all users frequently come across the “Low disk space Windows 10” if they’re frequent users of accounting applications.
Note: However, there may be a case where you have enough space on your hard drive and still receive the pop-up error. In such an event, you will be required to check the initialization configuration file of your QuickBooks Application. QuickBooks not enough space on drive c or QuickBooks Not Enough Memory occurs due to insufficient RAM for launching certain applications or performing certain actions. It’s not uncommon to experience low disk space windows 10 notifications on windows desktops.
Getting not enough disk space on a hard drive error message? Learn the quick fix to resolve the error.
You will receive the following message on your desktop when you are confronted with this issue:
- Insufficient storage space on the C: Drive.
- QuickBooks is running slow. Free some storage space.
- Not enough free space.
If you face any of the above error messages, follow the steps below:
Steps to Fix QuickBooks Hard Drive Space Issue
Step 1: Check the Hard Drive
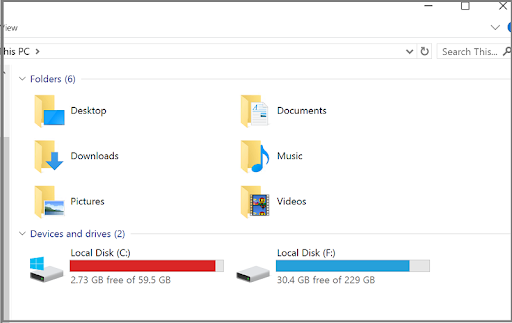
Check the current free space in your hard drive. Since QuickBooks require at least 1 GB space to install and run, make sure to have at least 2.5 GB to enjoy a seamless experience.
- Tap on the Windows Start menu.
- Enter “File Explorer” in your search and start File Explorer.
- Choose My Computer/My PC from the top bar.
- Double-click the icon of the hard drive( Usually the C: drive)
- Click on Properties. Identify how much free space you’ve right now.
Step 2: Free Space on Your Hard Drive
Note: It’s always advised to at least free up to 2.5 GB for QuickBooks to run optimally. If you’re having multiple files on your download tab, make sure to perform a quick clean up.
2.1 To Remove Temporary Files:
- Go to the search box in your taskbar, enter disk cleanup, and click on the Disk Cleanup from the search result.
- Choose the drive you require to clean up, and then hit on OK.
- Inside the Files to delete, choose the file types you need to remove. Select and remove it.
2.2 In Case You Require to Free Some more Space:
- Under the Disk Cleanup, click on the Clean up system files.
- Choose the file types to remove them and select it.
- Tap on OK.
There Are Other Steps, That You Can Follow:
- Clean the Disk
- Clear the Temp Folder
- Remove Programs that you don’t use
- Delete your Photos and Documents
- Refresh the Install File
Next Steps: Consider Upgrading
As a next step, consider an upgrade.
It might be time to upgrade if you’ve exhausted all other options and still need more storage space. You can go one of several ways:
- Consider a cloud hosting solution if you use QuickBooks Desktop Enterprise.
- QuickBooks must be transferred to the new computer in advance of the upgrade.
Note: If the steps mentioned above do not fix the issue, you will be required to reinstall your QuickBooks software completely. QuickBooks installation process can get stuck due to computing space requirements. QuickBooks needs to have more space on drive c is a common recurring issue for long-time QuickBooks users.
Also read this: How to Download and Install QuickBooks
FAQs
How much Hard Drive Space does QuickBooks Take?
QuickBooks requires a minimum of 1 gigabyte (GB) of free space on your computer in order to complete the installation procedure, and it requires a total of 2.5 GB for optimal performance.
How do I Free up Space in QuickBooks?
The following steps help in freeing space on your desktop:
Option 1: Making up space on your desktop
Note: Seeing a pop-up stating “Disk full error” is not an uncommon phenomenon.
If you’re unable to back up your files, follow the next step.
Option 2: Move your IDP temp files to a different location
You can move the temporary files to a partition or drive that has more space. To do this:
- Update to the latest release.
- On your keyboard, press the Windows key. In the search bar, enter “Notepad”, then press Enter.
- Enter the folder path where you want to move your IDP temp files.
For Example:
| If you want to move the file to: | What you should enter in Notepad | |
| Drive | Folder | |
| D:\ | IDPBackup | SymantecWorkingFolder=D:\IDPBackup |
| E:\ | IDPBackups in the Business Files folder | SymantecWorkingFolder=E:\Business Files\IDPBackups |
- Proceed to the File menu, then click on Save As.
- Whilst on the Save As window, navigate to C:\Users\AppData\Local\Intuit\Intuit Data Protect.
- Enter the “IntuitDataProtect.properties” in the File name field section and from the Save as type drop-down, select All Files (“.”). Select Save.
- On your respective keyboard, press the Windows key+E buttons together, navigate towards the C:\Users\AppData\Local\Intuit\Intuit Data Protect folder.
- Press and hold Ctrl, then select the Work and Temp folders. Right-click on any of the 2 folders, then select Copy.
- Access the folder, where you want to move your IDP temp files. You can Right-click anywhere, then click on Paste.
You can now continue backing up your files with Intuit Data Protect. The temporary files are now saved in a location with more space.
How to Fix Insufficient Disk Space on MAC?
The following steps help users solve insufficient disk space issues on Mac:
Step1: Find out How much Storage Space is Available
Mac displays the percentage of storage occupied by each file type and free space for new files. This storage data is dynamic and will be updated as you follow the instructions in this article to free up space.
- macOS Ventura or later: Select Apple menu > System Settings, then click on General in the sidebar, and click on Storage present on the right.
- Select Apple menu > About This Mac for older macOS versions, then select Storage.
Step 2: Optimize Storage Space
If you have an iCloud account linked to your Mac, you may take advantage of this feature to have more space available on the cloud whenever needed. Use your Mac to help you reclaim space on your hard drive. You can use the built-in tools to swiftly locate and remove unused data, such as files, apps, books, videos, etc.
Step 3: Move or Delete Files
You can move files from an external drive connected to your Mac. To save storage space, you can transfer media files such as photos and videos.
Delete files that are no longer in need, like:
- Delete files like movies, podcasts, and music or media, which are no longer available.
- Get rid of anything you don’t need from your Downloads folder. The Dock or the Finder’s Go > Downloads menu item provides access to this directory.
- Delete or uninstall applications that are of no use.
- Delete old software backups.
- Erase mail from Junk mail.
- Save compressed files.

