 QuickBooks · Apr 24th 2025 · 7 Min read
QuickBooks Email Setup: A Complete Guide for Business Owners
QuickBooks is a famous cloud-based and desktop-based accounting software in the United States and beyond. Intuit’s QuickBooks has been growing and adding new customers continuously. While many know QB functions, many don’t. For example, the QuickBooks email setup function. The accounting software has many functions and operations that can be performed while using it.
The user base for QB is so high that over 62% of users are solely from the United States. Considering this, the USA is a big business hub for QuickBooks users. Email service in QuickBooks desktop can be set up through Outlook or webmail like Gmail, Yahoo Mail, and others. Setting up email service in QuickBooks can directly streamline your business workflows. With the right email integration, you can seamlessly generate reports and statements, send and receive invoices, and access other financial documents on the go.
In this guide blog, you will learn the steps to set up your email on QuickBooks.
Before setting up Email Services on QB, Ensure You have the Following:
| Your username | Your password | ||
| Your incoming email server address | Your incoming email server type | ||
| Your outgoing email server address | |||
Step-wise Guide to QuickBooks Email Setup
Here is a step-by-step guide to the email service in QuickBooks Desktop.
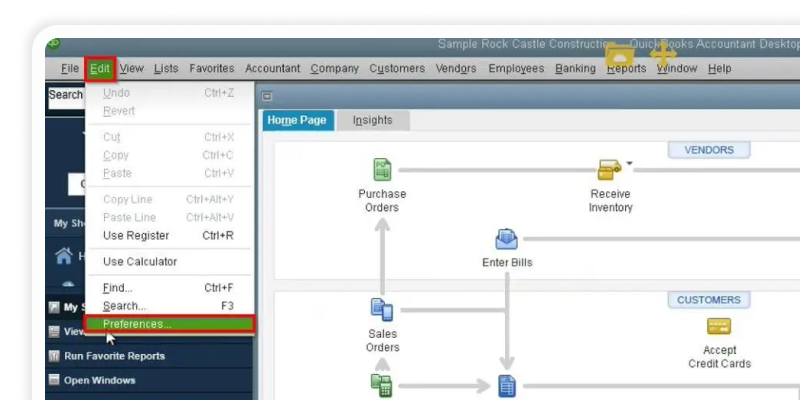
Step. 1: First, open your QuickBooks Desktop Application and click the Edit option in the top left corner.
Step. 2: Once you are at the Edit Menu, click the Preferences option.
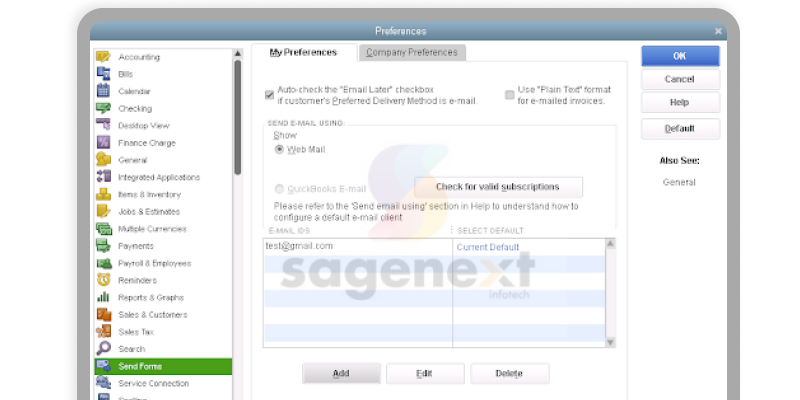
Step. 3: Once you click the Preferences option, a Preferences window will open on your desktop. Go to the left lane of the open window and click on the Send Forms Tab.
Step. 4: From the Send Forms Tab, under the title SEND E-MAIL USING: select the Web Mail option, and at the bottom, click the Add button.
Step. 5: Now, the Add Email Info window will appear on the screen. In that window, you must fill in your Email ID and specify your Email Service Provider. (Your email service provider can be Outlook, Gmail, Yahoo, or another.)
Step. 6: After entering your Email details, tick the Use enhanced security (Recommended) option. This will ensure SSL security is used to protect your Email information.
Step. 7: You need to enter the SMTP server details in the section below. After entering the correct SMTP details, click on OK to proceed.
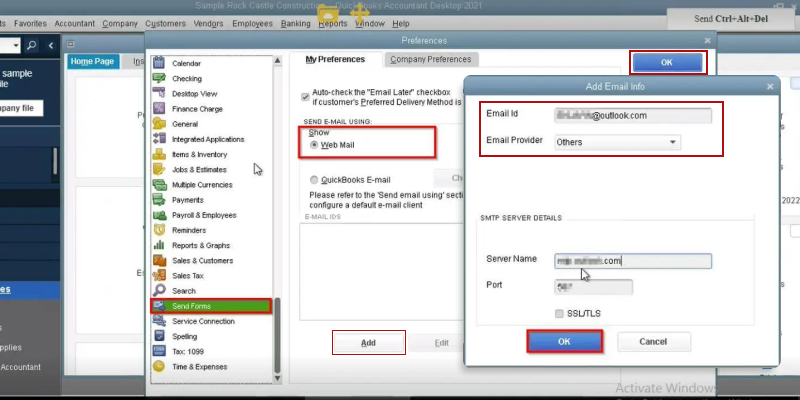
Step. 8: After completing the process, click OK in the Preferences window to finish the email setup for QuickBooks using the Webmail option.
Conclusion
QuickBooks is considered a great accounting software for small and medium-sized businesses in the USA. However, using the QB application requires knowledge. We have briefly illustrated a simple step-by-step guide to QuickBooks email setup for Gmail, Yahoo Mail, and Outlook Mail. The next time you need to fix an email in QuickBooks, you will not have a problem. Get your QuickBooks hosted and set up your email on your systems to streamline your workflows.
Host QuickBooks with Sagenext – Start Your Free Trial Today!
FAQs (Frequently Asked Questions)
How to set up email in QuickBooks?
To set up email in QuickBooks, follow these simple steps:
Step. 1: On the QB application, go to the Edit menu.
Step. 2: Then go to the Preferences option.
Step. 3: On the Preference option, select the Send Forms option.
Step. 4: Now select the webmail option and click the Add button.
Step. 5: Now, enter your preferred email address and select your email service provider. (Gmail, Yahoo Mail, and Outlook.)
Step. 6: Click OK to proceed with email set up on QuickBooks.
How to email invoices from QuickBooks?
To email invoices from QuickBooks, follow these simple steps:
Step. 1: Head on to the Sales option and then the Invoice Option on the QuickBooks Software
Step. 2: Select the invoice you want to email.
Step. 3: Click on Send from the drop-down menu bar.
Step. 4: Enter the receiver’s email address.
Step. 5: Review the invoice that is to be sent. And click the Send option to email the invoice to the receiver.
How to change the email password in QuickBooks?
In order to change your email password in the QuickBooks application, you will need to follow these steps:
Step. 1: Head on to the Account Manager Tab on QuickBooks.
Step. 2: Select the Sign in & Security Option.
Step. 3: Now, choose the Password section to change your email password on QuickBooks.
How to set up email for QuickBooks Desktop?
To set up email in QuickBooks Desktop, follow these simple steps:
Step. 1: On the QB desktop application, go to the Edit menu.
Step. 2: Then go to the Preferences option.
Step. 3: From the Preference option, select the Send Forms option.
Step. 4: Now select the webmail option and click the Add button. Enter your preferred email address and choose your email service provider. (Gmail, Yahoo Mail, and Outlook.). You may be asked to add an SMTP server for a custom email provider.
Step. 5: To proceed, click OK, and your email will be set up on QuickBooks.
How do I change QuickBooks email settings?
To change QuickBooks email settings, you need to follow these steps:
Step. 1: Go straight to the Preferences Menu Tab on QuickBooks Software.
Step. 2: Go to the Send Forms Option.
Step. 3: You can change your email settings or set up a new email account on this window.
What is the email format for Intuit QuickBooks?
Rich Text Format (RTF) is the email format for Intuit’s QuickBooks. The email is sent to the mail provider, which in turn sends it to the receiver.

