 QuickBooks · May 6th 2024 · 7 Min read
Change QuickBooks License Number or Product Code (Desktop/Mac )
There may be an event where you are required to change the license number or product code for your QuickBooks Desktop application. Learn how to change the license and product information here.
Note: In order to change the license number for your QuickBooks Desktop, you will not be required to uninstall or reinstall the application on your computer system.
Steps to Change QuickBooks License Number (Desktop)
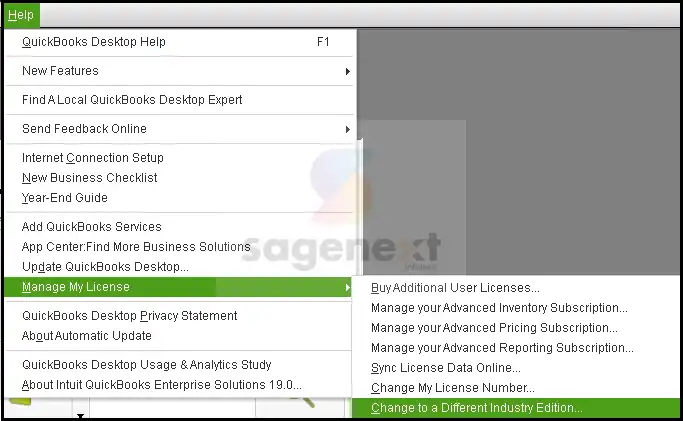
Step 1. First, you need go to the top bar in the QuickBooks application and look for the Help menu. Then click on it to open the drop-down menu.
Step 2. From the drop-down Help menu, select the option titled Manage My License.
Note: Alternatively, press the M key on your keyboard to highlight the option and then press the right arrow key to open it.
Step 3. The Manage My License menu will expand on the right. From that menu click on the option titled Change My License Number.
Note: Alternatively, you can use your keyboard and press the C key to highlight the option and then press the Enter key to open it.
Step 4. A new window will appear on the screen with four boxes.
Step 5. Enter the New License Number in the four boxes and click on the Next button.
This has been illustrated in figure:

Step 6. Click on the Finish button to save the new license number for your QuickBooks Desktop application.
Steps to Change the License Number of QuickBooks for Mac
Follow the steps to change the License Number of QuickBooks for Mac:
Step 1. Go to the QuickBooks menu and choose Manage My License option
Step 2. Then you need to follow Deauthorize This Computer prompt
Step 3. Once you get the prompt, you need to choose the Deauthorize and Quit.
Step 4. Restart your QuickBooks and follow the registration process. Then, you can enter the license number.
2 to Change the Product Code for QuickBooks Desktop
Method 1: Change Product Code by Uninstalling and Reinstalling QuickBooks
If your business uses QuickBooks Desktop Pro, Premier, or Enterprise on five or fewer computers, the best way to change the product code is to uninstall the software and then reinstall it.
1. First, you need to Uninstall the QuickBooks Desktop software from your computer system.
2. Next, you will have to Reinstall the QuickBooks Desktop application using your installation package.
3. Lastly, you will have to Activate your QuickBooks Desktop software using the real license information you bought when you purchased the software.
After this, the product code of your QuickBooks Desktop software will be changed automatically.
Method 2: Change Product Code by Editing the QBregistration.dat File Manually (Only applicable for QuickBooks Desktop Enterprise)
In case you have a QuickBooks Desktop Enterprise version installed in five or less than five devices or computer systems, it is recommended that the reinstallation method mentioned above be used to change the product code. i.e. by editing the QBRegistration.dat file on your desktop. This file contains product codes for all installed versions of QuickBooks software.
Note:
- Users do not have authority to remove QuickBooks license or change QuickBooks product number on their desktop.
- It is recommended to seek the help of an IT professional in case you feel uncomfortable about following the mentioned steps.
1. Open your QuickBooks Desktop Application.

2. Now, use your keyboard to press F2 key (or CTRL key+1). After that, you must open the Tech Help Window by pressing the F3 key (or CTRL key+2).
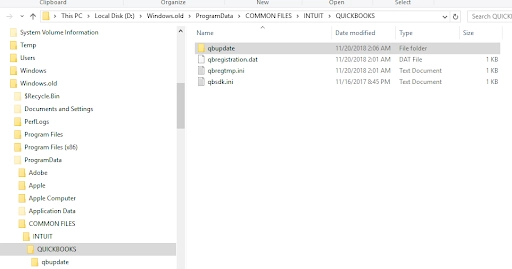
3. Now, select qbregistration.dat from within the Open File tab. Next, Click on the Open File option to open it. The qbregistration.dat will now be opened in the Notepad application.
4. Next, you need to create a backup of the qbregistration.dat file on your computer.
You may also like: How to Find QuickBooks License and Product Key
This backup is made so that you can get back to your QuickBooks version if you make a typo while editing a file, which could cause an error when you open your QuickBooks Desktop.
How to Create a Backup of qbregistration.dat File
Below are the steps to Create a Backup of the qbregistration.dat file:
- In Notepad, click on the File button on the top bar to open a drop-down menu.
- Now click on the Save as option from the drop-down menu.
- Choose Desktop as the location to save the file from the browsing window, and click on the Save button.
- Close the file after saving.
How to Edit the qbregistration.dat File
Steps to Edit the qbregistration.dat File are as follows:
- After creating a backup, re-open the qbregistration.dat file from the Tech Help window.
- Now close your QuickBooks Desktop application. Do not close the qbregistration.dat file in Notepad.
- From Notepad, select the Edit option from the top bar for the drop-down menu. Next, click on the Replace option.
Note: Alternatively, you can use your keyboard and press CTRL key+H to use the Replace feature.
- In the Replace dialog box, you will be required to enter your old Product Code in the Find what section in order to search for it in the file.
Then, you will need to enter your new Product Code in the Replace section. Please use the following format to enter the Product Code: XXX-XXX
- Click on the Replace All button and close the dialog box. All instances of your Old Product Code will now be replaced with the New Product Code.
- Next, click on the File button to open the drop-down menu and select the Save option to complete the changes.
After completing the edits in the QBregistration.dat file, you will need to check if the product code has been changed correctly.
Note: Incorrect QuickBooks product number can cause major activation problems during installation.
How to Check Your Product Code
1. Open your QuickBooks Desktop application.
2. Use your keyboard to press the F2 key in order to open the Product Information Window on your screen.
3. Now, check the Product Number Field in the window to see if the Product Code of your QuickBooks Desktop application has been updated.

or

Note: Incorrect QuickBooks product number can cause major activation problems during installation.
If the product code hasn’t been updated, you can restart your computer to see if the changes have been made.
After restarting the system, if the Product Code has still not been updated, it is recommended that you follow the uninstallation and reinstallation process mentioned in Method 1 above to change the Product Code for your QuickBooks Desktop application.
How do I Transfer my QuickBooks License to a New Computer
Users can migrate their QuickBook licenses just by migrating their QB application to their new desktop. The procedure given below helps you perform the migration procedure:
For your Old Computer
- Open QuickBooks.
- Access your File menu, select Utilities, and then choose Move QuickBooks to another computer option.
- Create your designated one-time password after that select the I’m Ready option.
- Choose a USB flash drive using the instructions. Then wait for the files to be copied.
For your New Computer
Follow the steps transfer QuickBooks License to New computer by setting up Migrator tool:
- Plug in the USB drive. Because of Windows security restrictions, the Migrator Tool won’t open independently.
- Open the flash drive to see its files, and double-click the file Move QuickBooks.bat to start the migrator.
- Type in the password you just made, and then click Let’s go.
- Just wait until the Migrator Tool is done. This depends on how fast your computer and internet are and how big your company file is (s).
After completing your migration process, you can view your QuickBooks License number by following the same procedure mentioned above.
Conclusion
If you have questions about how to find QB license numbers or how to add user licenses, you can contact our QuickBooks Consultant team, which is available 24 hours a day, 7 days a week. When you need help, the team is happy to help. Feel free to give us a call at +1-855-922-7243 (Toll-Free) or drop an email at sales@thesagenext.com.
FAQs
Why are QuickBooks License Numbers and Product Names Required
QuickBooks license numbers and product names are to provide access and authorization prowess. While installing a product key and license are required to show the product’s authenticity and avoid installation errors. You must keep your QuickBooks desktop license and number because it can help you to get aid from QuickBooks support if any technical issues arise.
Where is QuickBooks License and Product Number Stored
If you bought a digital version of QuickBooks Desktop from Intuit, the original purchase confirmation email has all the information you need about the product. If you bought QuickBooks from a store, look for this label next to the UPC Code on the original box.

