 Windows Server · Mar 28th 2025 · 7 Min read
How to Change RDP Port Number for a Windows Server?
The default Remote Desktop Protocol (RDP) port number for Windows servers is 3389. This article will list out the steps to change the RDP port for a Windows server. In order to complete the process, users are recommended to follow the steps in accordance to achieve the best performance.
Methods to Change The Listening Port on Windows Computers
Method 1: Change the RDP Port on Registry
There are two methods to change an RDP port on the registry. Often users see search terms like “Change remote desktop port windows server 2019” and “change RDP port number in windows server 2019” frequently. Follow the steps mentioned below to successfully complete the process of changing the Remote Desktop Protocol Port on the registry.
1.1 Change the RDP Port by Modifying the Registry Manually
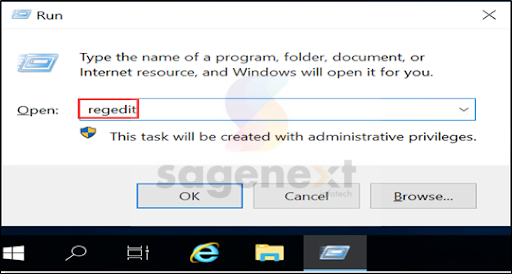
- Press the “Windows + R” to open the Windows Run dialog box on the operating system.
- Type “regedit” in the Run box and press Enter to open Windows Registry Editor.
- Now, proceed to navigate to the following registry subkey:
HKEY_LOCAL_MACHINE\System\Current
ControlSet\Control\Terminal `Server\
WinStations\RDP-Tcp\PortNumber
- Once the user has typed the subkey, click on the Edit option.
- After this, the user will have to choose the Modify option.
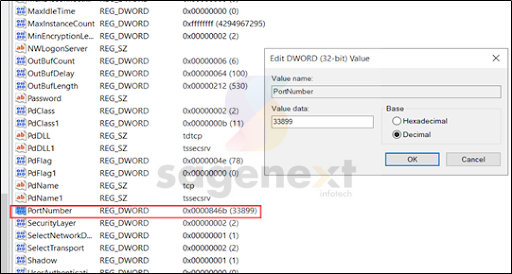
- Once clicked on the modify key, proceed to click the Decimal option.
- Here, type the new port number, and then you are required to tap on the OK option.
Note: The recommended range for the RDP ports is 1024-65535. Users advised to note it down properly to avoid any difficulty in the process.
1.2 Change the Registry with PowerShell Command
- At first, users will need to open the Windows PowerShell in their operating system. For this, type PowerShell in and find out the option to click on it.

- Now, users requiring to run the following commands in the Administrator Windows PowerShell. Please note down the command as given below:
Set-ItemProperty -Path ‘HKLM:\SYSTEM\Current
ControlSet\Control\Terminal
Server\WinStations\RDP-Tcp’ -Name ‘portnumber’ -Value 33899

Note: That 33899 is the RDP port changed in the last step. So, users are recommended to change the parameters according to their settings.
Method 2: Open the New RDP Port in Windows Firewall
- The newly set Remote Desktop Protocol Port must be open in the firewall before it uses. Users recommend referring to the How to Open a Port in Windows Firewall on how to open a port in Windows Firewall,

- If this solution doesn’t provide suitable resolutions, move forward to the next method to end the process successfully.
You may also read: Complete Guide on Network Firewall Security
Method 3: Restart the RDP Service
Step 1: Users require to type “services” in the Search box. Now, this will Open the Services box in your operating system screen.

Step 2: Users are recommended to restart the remote desktop services by right-clicking on the option of “Restart”. Users will now have to wait for the restart process to get finished successfully.

Method 4: Run a Test
- Users recommend testing the connection of the server with the help of the option of a new Remote Desktop Protocol Port.
Note: Users are required to fill in “IP:Port” in the Computer column. Once entered, the user will be needed to click on the connect option to proceed further. For example 10.10.XX.XX:33899.
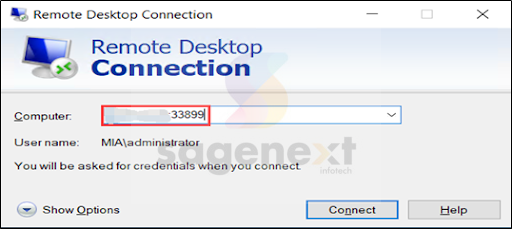
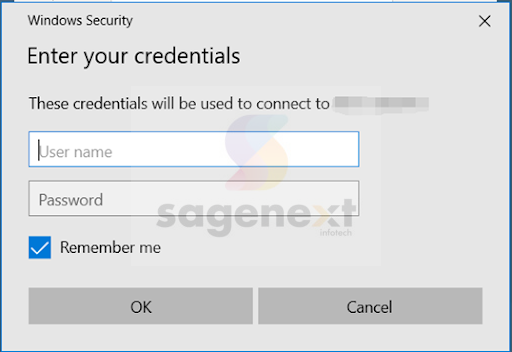
- After selecting the connect option, the user will get a screen titled “Window Security”.
- In the box, type your username and password, and don’t forget to checkmark on “Remember me”.
- Lastly, select the OK option.
Hopefully, with all these methods users can change the RDP Port for a Windows Server.
FAQs
How to Change RDP Port in Windows Using Windows Registry?
The following steps shall help you change your RDP port:
- Start the command prompt as a manager or as an administrator.
- Type “regedit” into the command prompt to open the Registry Editor. Find and then click the following subkey in the registry:
HKEY_LOCAL_MACHINE\System\
CurrentControlSet\Control\Terminal Server\
WinStations\RDP-Tcp\PortNumber –
TcpPortNumber is where you set the number of the port.
- Click Modify on the Edit menu and then click Decimal.
- Type the new port number, then click OK.
- Put the Registry Editor to rest.
- Restart the computer.
How to Connect a Remote Desktop with a Custom RDP Port?
This tutorial will teach how to change a Remote Desktop Services RDP port to 33091. To do it:
Note: The RDP default port number or listening port number is 3389.
Step 1: Use RDP to connect to a Windows client or server
- Press WIN+R, type regedit, and then press Enter to open the Registry Editor.
Step 2: Go to the Remote Desktop Registry (RDP-Tcp)
- Go to the key HKEY LOCAL MACHINESystemCurrentControlSetControlTerminal ServerWinStationsRDP-Tcp.
Step 3: Change the RDP port number by default
- Change the port to 33091 by double-clicking on the PortNumber value (Decimal).
- Change-RDP-port-tutorial-v2cloud
- To save the changes, click OK.
- For changes to take effect, you need to restart your Windows computer or use the command prompt to restart the RDP services.
- Cmd: net stop saying “service and net.”
Step 4: After restarting the Windows computer
- Use RDP to connect to it and add the new RDP port.
Step 5: Make sure the RDP port is listening
- Once you’ve connected to the Windows computer using the new RDP port, you can use the netstat -na | Find “List” command to ensure Remote Desktop Service is listening on the new port.
- Changing the RDP port makes it less likely that port scanners or RDP vulnerabilities can be use.
How to Configure Windows Firewall for Custom RDP Port?
Follow the instructions given below to configure Windows Firewall:
Step 1: Start Windows Firewall. We presume you are familiar with the Windows Firewall interface as you successfully opened an RDP connection there.
Step 2: Launch Windows Firewall and select the Advanced tab. Microsoft Windows will launch the Windows Firewall with an Advanced Security window.
Step 3: Then, in the right pane, select New Rule after selecting Inbound Rules on the left.
Step 4: Examine the port radio and click on the next tab.
Step 5: Leaving the TCP radio checked type in the port number you changed or added for the RDP listening port. Click on Next
Step 6: Verify that the box labeled Allow the Connection is checked, and click the Next button.
Step 7: On the following page, select the networks to which this rule should apply, and then click the Next button.
Step 8: Give the Rule a name, and then click the Finish button.

